 Step One:
 Start up Photoshop from the Start menu, and select “Edit” from the welcome screen.
Step Two:
Select File/New/Blank File (CTRL+N)
Set up the file size to your liking. A width of 600 pixels, height of 400 pixels, and resolution of 72 pixels should work fine for this tutorial.
Select File/New/Blank File (CTRL+N)
Set up the file size to your liking. A width of 600 pixels, height of 400 pixels, and resolution of 72 pixels should work fine for this tutorial.

Step Three:
Get to know your workspace. Down at the bottom right is the “Layers” pallet.
From here you can move layers around, add new layers, delete layers, mess around with layers, turn layers off, turn layers on. Pretty much, you can do all the layery things you’d like.
Things to note:
The Opacity of a layer determines if it is “see through” or not.
Clicking the eye beside a layer will hide and show it.
Clicking the lock beside a layer will prevent you from moving / editing that layer.
The little page in the bottom left adds a new layer.
You can change the name of a New Layer by double clicking on its name.
The half white, half black, circle allows you to create “adjustment / effect” layers. Try some out for yourself.
 Step Four:
Get to know
your Tool Bar
Step Four:
Get to know
your Tool BarThe top left arrow lets you select objects and move them around.
The magnifying glass lets you… magnify things.
The hand lets you drag the canvas around, if it’s bigger than your working window.
The eye dropper allows you to change your foreground colour to what you click on.
The dotted rectangle lets you create a rectangle selection. Hold the button down over it, and you can choose a rounded selector too.
The lasso allows you to create a custom selection. Hold down that button and you can choose a Magnetic Selector (that will cling to things of similar colour) or a polygon selector that lets you choose angled points.
The Magic Wand selects everything of a similar colour to what you click on.
The wand to the right of it is similar, but grabs large areas as you “paint” with it.
The T lets you type.
Beside the T is the crop (resize) image option.
The rest I have faith in your ability to figure out by playing around with them, and paying attention to their tool names.
Looking to the bottom you will see two squares – this allows you to choose your foreground and background colour. You will be able to paint with these (using the brushes). Note, you can swap the two colours by clicking on the arrow that points to them both. Double click a square to set the colour you want for it.
Step Five: Create a new layer. Call the layer “Orange Circle.”
Next, Grab the Circle Tool and draw one (make
it Orange just because you can.) First,
change the foreground colour to orange, then hold the mouse button down over
the rectangle (the one beside the water droplet, near the bottom of the tool
bar. Select the Oval tool.
You may have a hard time making a perfect circle – BUT – if you hold down the [SHIFT] key while you form your circle, it will be perfect every time.
When you release you will notice you’ve created a new “shape layer” but we don’t want that. We want it to just be part of the image. So – right click on it, and select “Simplify Layer”. This will turn it into a regular everyday layer, and you’ll be much happier.
Next you’ll notice that the orange circle isn’t on your “Orange” layer, but rather on a “shape” layer above it.
Right click on the layer and choose “Merge Down” (alternately CTRL+E) now you’ve merged the shape layer with “Orange” (provided that you had the Shape layer selected… which you should have, if you followed the steps.)


If something goes
wrong, remember you can always CTRL+Z to undo your mistakes.
Step 6:
Working with the Lasso…
Working with the Lasso…
Select
the regular lasso and try to select the circle, perfectly. You’ll notice it’s more like one of those bad
infomercials where someone can’t cut an onion without the new product of the
month. But fear not, we’ll try with the
polygon tool.
To get that, remember – long click on the lasso until it pops up your other options. Select Polygon tool. You’ll notice it’s a bit easier, but still not rounded. Next up, try the Magnetic lasso.
To get that, remember – long click on the lasso until it pops up your other options. Select Polygon tool. You’ll notice it’s a bit easier, but still not rounded. Next up, try the Magnetic lasso.
You’ll
notice this is much easier. It may be
too sensitive at first, but watch how the lasso clings to the similar colour,
allowing you to be precise with your selection.
You should be able to perfectly select your circle this way. BUT…
To
make things easier, since the circle is all one colour, click on the Magic Wand
tool and then click on the circle.
Perfect selection!

 Step 7:
 Messing with Selections is fun and easy. For example, let us take a small chunk out of our circle’s selection. To do this select the polygon lasso. Hold down the [ALT] key and you will notice a little (-) minus sign appears by the tool. This lets you know you will be removing pieces from your selection. Note: This will not affect your image, just the dotted selection.
With your
circle selected, and the ALT key held down click in the middle of your
circle. Make a triangle, and then join
up your selection with the first click you made. You will notice your selection now has a
piece missing.
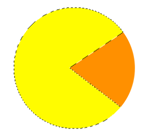
We will now play with the new 3/4 circle selection.
We will now play with the new 3/4 circle selection.
 Step 8:
Changing colours…
Double Click on the Orange Foreground colour and change it to Yellow. With this done, select your paint bucket. It’s the tool above the Circle Creating tool.
With a Yellow Paint bucket Selected Click in your selection and you will notice the selected area is now yellow. But there is still that one orange wedge.

Step 9:
You have a selection, but you can also INVERSE your selection. Basically that means select everything that is not CURRENTLY selected. To do this go to the Menu bar at the top, Select / Inverse Selection (CTRL+SHIFT+I)
Now, it may
not look like your selection has changed, but I assure you that it has. See the dotted line around the border of the
screen now?
Change your
foreground colour to black. Now click in
the white area. Changed! Now all is black, but not the orange – even
though it was part of your selection.
You will only affect an area of similar colour with your paint
bucket. True story. Press CTRL+Z to undo the pain bucket and then
paint the orange area. See how the white
stays white?
Now click on the white area too – and you have a yellow three quarter circle on a black field.
But wouldn’t it be easier if the black field was its own layer? Of course it would be. So just hit the delete key – and all that black (everything in the selected area) goes away!
Now click on the white area too – and you have a yellow three quarter circle on a black field.
But wouldn’t it be easier if the black field was its own layer? Of course it would be. So just hit the delete key – and all that black (everything in the selected area) goes away!
You may notice some black along the mouth of
the yellow area – this is because your “selection” is not pixel perfect. It “feathers.” This allows some blending which is important
with photo editing. Google feathering if
you want to learn how to change this around.
Now hit [ESC] to remove your selection, select “Background” layer and just paint bucket that black.
Now hit [ESC] to remove your selection, select “Background” layer and just paint bucket that black.
Step 10:
Select your top right tool, that lets you move things around. Click on your yellow object, and you will notice “Orange” layer is now selected. Move that object as far to the middle / right of the screen as you can. And while you’re at it – change the layer name from “Orange” to “Yellow”. Surely you remember how – even though it was way back in an early step!
Select your top right tool, that lets you move things around. Click on your yellow object, and you will notice “Orange” layer is now selected. Move that object as far to the middle / right of the screen as you can. And while you’re at it – change the layer name from “Orange” to “Yellow”. Surely you remember how – even though it was way back in an early step!
 Step 11:
Create a new layer called GHOST.
With Ghost layer selected, grab the Elliptical selector tool. It’s under the hand. Long click on it if you just see the Rectangle one. Draw an elliptical selection on the screen. Then switch to the rectangle selector tool. Hold down ALT and cut off the selection right in the middle.

Next, hold down the shift key. Where there was a Minus when you hold ALT there is now a (+) plus. Be as precise as you can and add a rectangle to the bottom of your half circle selection.
Using the Elliptical selector tool, round out three little circles at the bottom – then fill in the whole selection Orange (because Clyde is the best.)
 |
Finally use your circle creators to add big eye whites and blue pupils to your orange ghost. Then add a small white circle inside the yellow area’s mouth, and a bigger white circle (a power pellet, if you will) in front of the ghost… so – you know – Pac-Man won’t die.

After you’re Finished:
So you’ve created your image – learned about selector tools, objects, and layers. You’ve got a good handle on how to use photoshop now. However, there are some more things to try out.
So you’ve created your image – learned about selector tools, objects, and layers. You’ve got a good handle on how to use photoshop now. However, there are some more things to try out.
Remember I
said the opacity bar toggles the “see-through-ness” of a layer? Try playing around with that by selecting
layers and turning them down.
Turn down
the ghost – then move pacman over the ghost – then turn the opacity back
up. See what’s happening?
You can also try out the “Adjustment Layers” (the
white and black circle) and try moving them around to see how their positioning
affects the image.
Basically –
at this point, you’ve created your “Nerd Flag” and now just need to try some
things out. If you’d like, copy and
paste a picture into photoshop and try playing with that too.
No comments:
Post a Comment